Does Your WordPress Theme Waste Storage Space When You Upload Images?

Whether uploading images directly in the WordPress Media Library or by uploading and inserting an image while writing a blog post, WordPress allows the theme you install to change the way WordPress handles images when you upload them to the Medial Library. If you happen to pick a theme where the theme designer/programmer decided to create many different image sizes when images are uploaded, you may be wasting a lot of storage space.
Why Does Storage Space Matter?
These days, storage space isn't nearly as expensive as it used to be, so this excessive use of space isn't a huge deal for small websites that don't have a lot of pictures being uploaded (i.e. a WordPress site that is mostly made up of static pages and blogs once or twice a month).
But for websites that start to have over 100 images uploaded to the Media Library, the space requirements can really start to add up.
Where users can really feel the bloat is when they go to backup or transfer their WordPress website. Backups can be unnecessarily HUGE.
How to Find Out How Many Copies Your WordPress Theme Creates for Each Uploaded Image
SSH or FTP
For the technically inclined, discovering how many copies a theme creates for each uploaded image can be found by viewing the "uploads" folder located by default in "wp-content/uploads" directory from an ssh or ftp session. Simply upload an image to the Medial Library in WordPress, then check the uploads directory.
WordPress Plugin
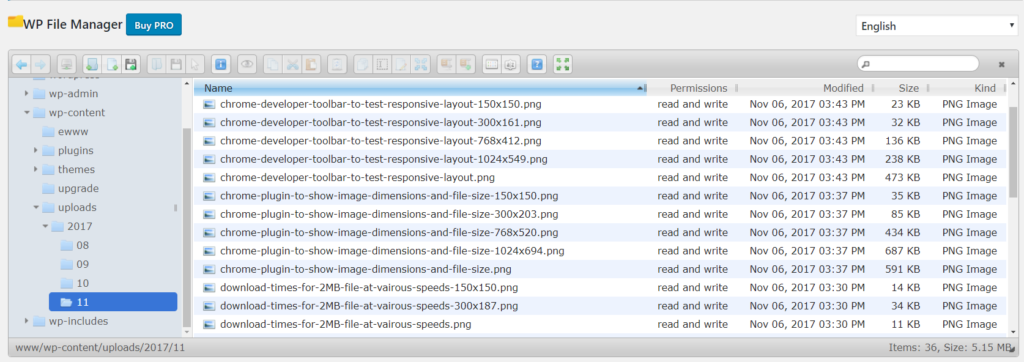
Another way, for the typical Worpress user is to install a file viewing tool like the File Manager plugin by mndpsingh287. Simply install the plugin and then use it to navigate to the "wp-content/uploads" directory where you can view the files created after uploading a file to the Media Library.
Below is a screen shot that shows there are 4 copies made for just about every upload. These are actually the default sizes created by Worpress (see default section below), so the theme is not telling WordPress to create any extra copies.
Notice the copies have the same file name, but with an extension to show the dimensions (i.e. 150x150). Also note, the original "Full Size" is kept as well, and is not named to reflect its dimensions. The file size of each file is also shown.
Also note that if an original image has dimensions that are smaller than any of the sizes created by default or added by the theme, the larger copies are not created. This is seen in the bottom three files in the screen shot below, where only to copies of the original were made.
How Does a Theme Create Extra Image Sizes for Each Image Uploaded?
WordPress has a function that a theme programmer can use in their theme to tell WordPress to create more images than the few default image sizes that WordPress already creates.
The add_image_size function can be coded in the theme's functions.php file to tell WordPress to create another image size for each image uploaded. If the function is used multiple times, it will create multiple extra image sizes for each image upload.
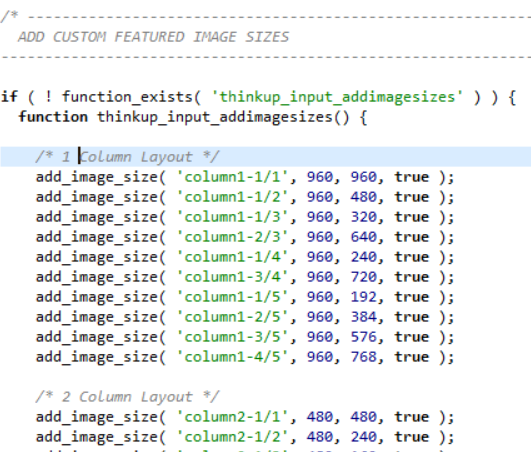
I recently went to backup a website for a client that had just over 200 different images in the WordPress Media Library and the saw that the uploads directory (where WordPress stores uploaded images in the server's file system) was a whopping 2GB (2,000 MB). Upon further investigation, I found that the theme was creating 45 different image sizes for each image uploaded.
So here's what was happening on this user's instance of WordPress. The user would upload a file to the Media Library while writing a blog post. Most of the images came from pictures the user took with an iPhone. So each image was about 2MB. Upon uploading, the theme would cause WordPress to make 45 copies of that image in various sizes. The sizes got smaller and smaller with each variation, so (luckily) the file size of each copy would get smaller and smaller. But each 2 MB file ballooned to require about 10MB of space for the original and all its various sizes.
The funny part is that none of these extra copies were needed or used. Just the few default sizes already created by WordPress were good enough.
Why is There a Need For More Than Just One Size of Each Image?
There are two main reasons why a website would need more than just the original image uploaded by the WordPress user.
- User Experience (UX)
- Search Engine Rankings (SEO)
User Experience
The first reason multiple image sizes are needed is for user experience (UX). The bigger an image file size, the longer it takes to download and appear on a website visitor's screen. A website visitor gets frustrated if the visitor comes to your website and your site takes a long time to load. These days a website should feel like it's loading almost instantly (no more than a few seconds), even on a mobile device over a cellular network.
In the early days of the internet, when download speeds were much lower than they are now (think AOL 56k dial-up days), it would take at least 5 minutes to download a 2MB image.
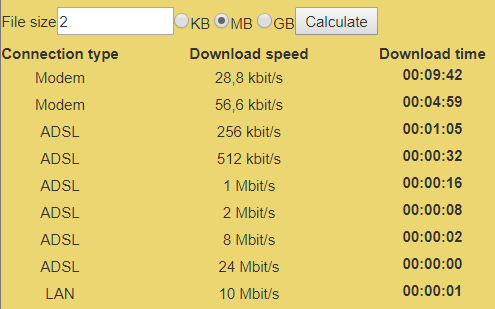
So if a webpage had 5 images directly from a camera on it, there would be no way a visitor would stick around to wait 25 minutes for the page to display.
These days with the massive increase in download bandwidth, due to the proliferation of video on the web, the time to download and display those 5 pictures at their original size of 2MB is much less, but because we've become so accustomed to instant gratification, even the extra 5-10 seconds it may take to display your website is now too long to keep a visitor interested in sticking around to get the information from your website.
Thus, a WordPress user needs to make sure the pages and posts the user creates is using images that have file sizes that download quickly so website visitors have a fast loading experience.
Rarely should the original size of the image be inserted unless the image has already been optimized. An image taken from a camera is unnecessarily too big to use on the web for informational purposes. The reason the file size is so big is so that the picture can be printed on physical paper at high resolution. Pictures taken from an iPhone can easily be printed and look amazing on 8"x10" photo paper.
With the proliferation of tablets and mobile devices, screens now have a large variation in sizes from big to small. Even the bigger screens, and especially mobile screens can't show your 2MB picture taken directly from a camera on its respective screen at full resolution. The visitor's browser is will scale (resize & compress) the image down anyway. Thus, to better user experience, an image should be resized and compressed before sending it to the visitor such that it can be downloaded and presented to the visitor much faster.
WordPress creates scaled down copies of the images uploaded to the Media Library. These scaled down images reduce the visual size, picture quality, and storage size (and therefore the download time) of the uploaded picture so that the WordPress user can choose the right image to send to their website's visitors.
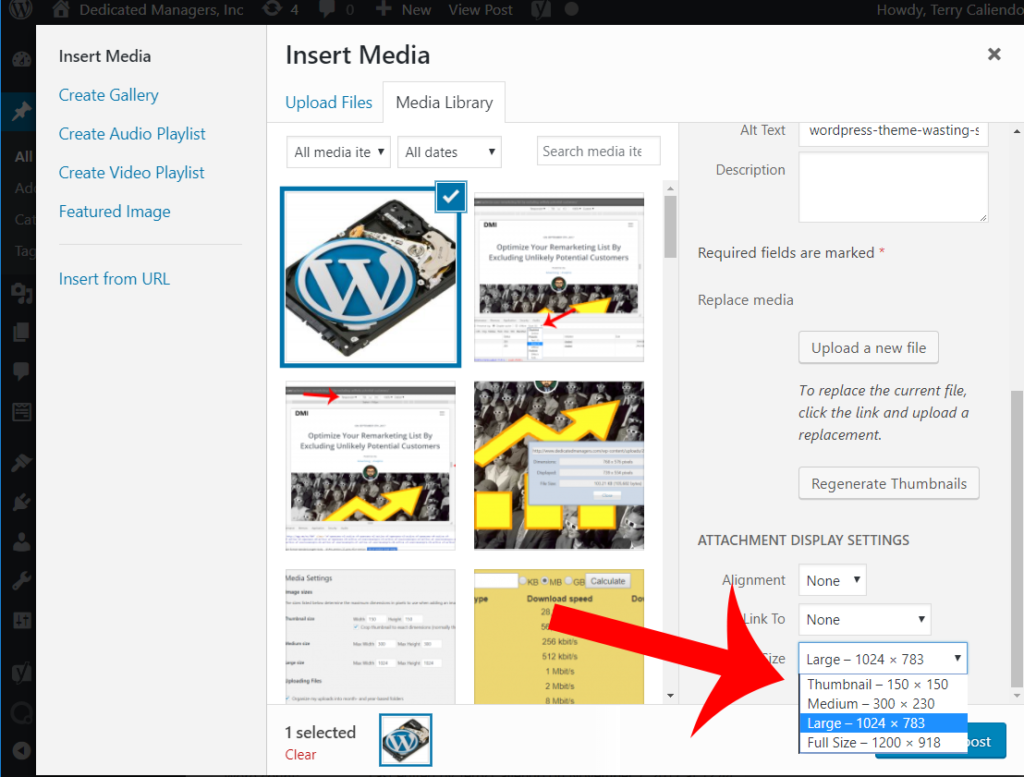
This is where some technical knowledge of a WordPress user is required. The user that is creating a WordPress page or blog post chooses the size of the image to insert in the page or post, which affects the user experience.
Search Engine Optimization
The second reason multiple sizes of images are needed is for SEO purposes. Many SEO experts believe that image sizes weigh in on where search engines like Google choose to place the link for your page in the results of a user's search query because it affects the page load time and ultimately the user's experience. Search engines want to send traffic to websites where the user gets not only the information they are looking for, but gets the them information the fastest.
What are the Default WordPress Image Sizes?
By default, WordPress creates three image sizes when you upload an image to the Media Library (there's actually a new 4th size in newer WordPress versions, but it's used for thumbnails and only accessible to the theme creator, not the WordPress user). You can change the defaults by going to Settings >> Media in your WP Admin Control Panel.
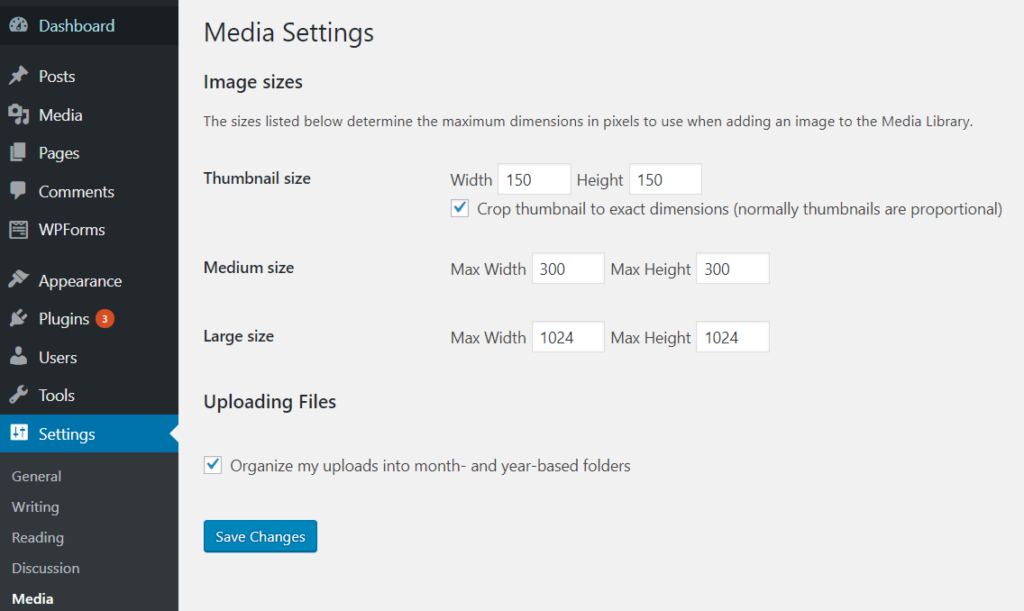
Default image sizes created when an image is uploaded to WordPress Media Library
- Thumbnail = 150 X 150 pixels
- Medium = 300 X 300 pixels
- Large = 1024 X 1024 pixels
The dimensions above are the maximum width and heights in pixels that the image can be on one side. The resizing process keeps the proportions of the image uploaded so either the width or height will be less than each size's limit if the picture is not square. A picture taken with the rear (main) camera on an iPhone 7 Plus has dimensions 4032 x 3024. So the default "Large" copy becomes 1024 X 768 pixels (width X height).
What Image Dimensions (With x Height) Should be Used in a Page or Blog Post?
This is a difficult question to answer succinctly as it depends on your layout and how your website is presented on various devices. These days every website should adjust for the device or (more commonly) the screen size it's being displayed on.
One of the biggest ways to accomplish that is with a "responsive" layout. To fully explain responsive website layout design would take an entire blog post in itself, but suffice it to say, in simple terms, "Responsive" layout design most often means the website adjusts based on the screen size that's displaying it.
The change in the layout will affect the images on the page or blog post. Thus, you'll want to choose an image size that is going to look best at the largest width in which the image going to display (see how to test a responsive layout on your desktop/laptop below). Typically a width of 1024 or 768 pixels will suffice. Height is not as important and usually ends up being whatever height it takes (automatically by WordPress) that keeps the width-to-height ratio the same as the original image.
What Image File Size Should be Used?
The image file size is actually the most important factor for user experience (fast download time) and WordPress does not make the file size apparent to the page or post creator when an image is inserted in a page or post. This often leads to the page or post creator inserting images with unnecessarily large file sizes.
WordPress also does not do a great job of compressing images properly when WordPress creates the various image sizes upon upload to the WordPress Media Library. This lack of high-quality compression isn't all WordPress' fault, as WordPress relies on the underlying image manipulation tools which are available to it from PHP and its server installation/configuration. Thus, high-quality compression is mostly beyond WordPress' control.
In fact, the lack of high-quality image compression is why image optimization plugins are popular, with the better ones charging a fee as they tend to send the image over for compression on servers maintained by the plugin developer (which is an expense to the developer).
With all that said, typically a 1024 x 768 pixel jpg image, without much intricate detail, can look very good as low as 40 kB. A 40 kB image will load quickly even on mobile devices using today's common cellular speeds. Unfortunately, WordPress usually creates jpg images that are around 110kB at a size of 1024 x 768, which is almost triple the size and therefore triple the time to download. With internet speeds getting faster and faster, this isn't a huge concern if there are only a couple images (maybe a difference in a second or two), but getting the smallest image file size without sacrificing visual quality to a significantly noticeable extent always allows for the happiest user experience.
WordPress Now Helps with the Browser Decide Which Image to Download
As of version 4.4, WordPress is now including alternate image sizes (via the srcset attribute on images) for the browser to decide what size image to download. This is a helpful optimization technique to better user experience. Theoretically, this should make it easy for a post creator to insert the largest image size (dimensions and file size) and allow for the browser to choose which size to download. The srcset attribute is still relatively new in implementation, however, so it should not be fully relied upon just yet.
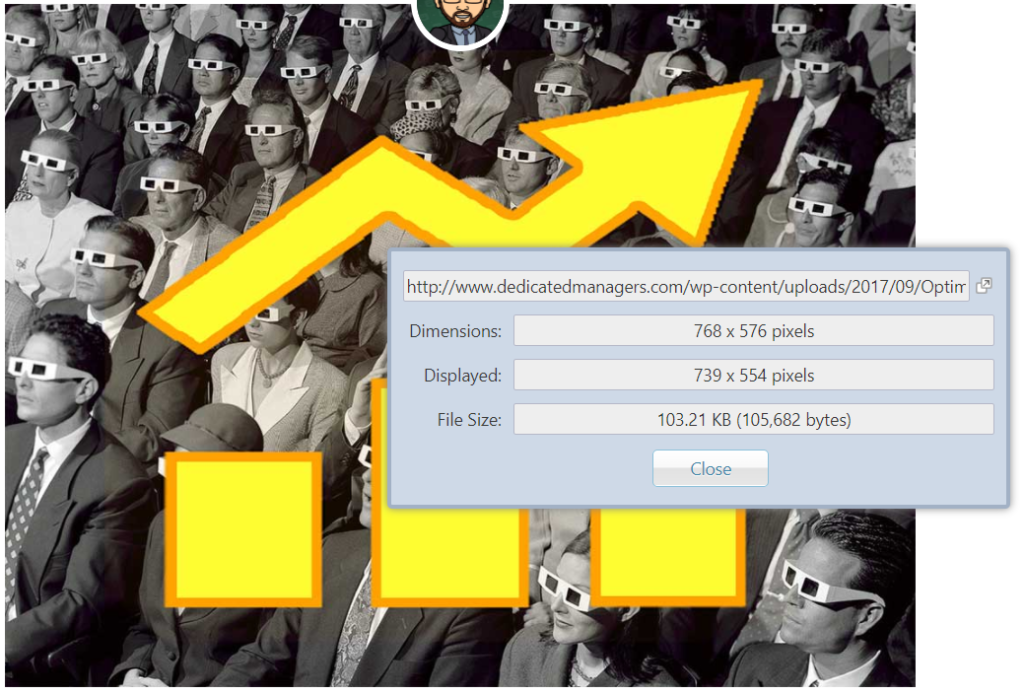
How to Verify Image File Sizes
WordPress doesn't show the file size of the image that is being inserted into a post, but there are ways to find the image size.
One way to check the image file size is to view the post, right click on the image, download the image, then view the image size by inspecting its properties on the local computer.
Another way to check the image file size is to use a browser plugin like Image Size Info by Igorware for Google's Chrome browser so that you can right click on the image in your browser and view the image file size right in the page (unfortunately I haven't found a plugin that works with background images, so there may be times where it doesn't seem like the inspector isn't working).
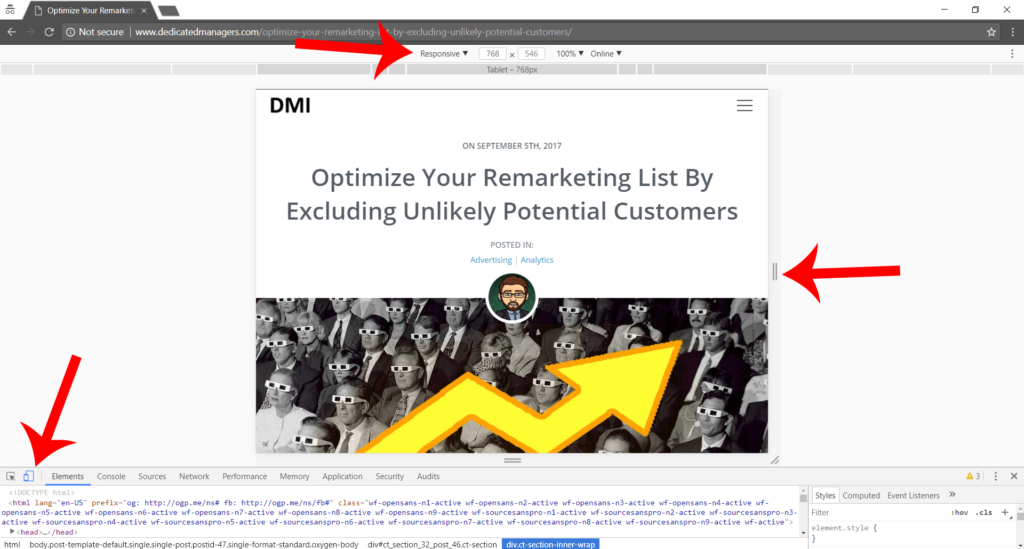
How To Test a Responsive Web design
Google Chrome is a fantastic browser for developing websites as it has a fantastic development environment built into the very browser that everyday users download. While using the Chrome browser, right-click on any item in the browser window and choose "inspect". Doing so opens up the development area where you can click the "toggle device toolbar" icon (lower left in screenshot below) to view the website at various screen sizes.
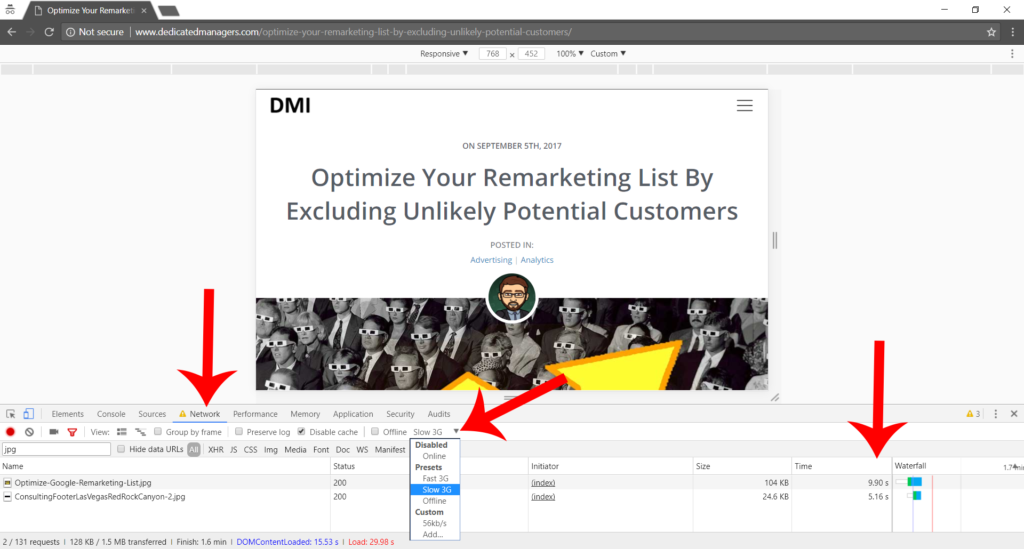
How to Test User Experience by Throttling Download Speed?
Google Chrome also has the ability to throttle its download speed such that user experience can be simulated for slower connection speeds. While using the Chrome browser, right-click on any item in the browser window and choose "inspect". Doing so opens up the development area where you can click the "Network" tab and subsequently change the download speed. Make sure to check "disable cache" so that all the page assets, including all the external files and images, are always downloaded as would happen with a user's first visit to your page.
Conclusion
This article was written to inform the reader that a WordPress theme has the ability to change the way WordPress handles images. WordPress themes have the ability to increase the number of images created when an image is uploaded to the Media Library, which can lead to excessive use of server storage space.
Furthermore, some basic information was presented on why multiple image sizes are necessary. A brief introduction on how to choose which image dimensions to use was given, along with some simple examples on how to find the file size of images used on webpages.
Understanding image file size is paramount to creating a website that has a high-quality user experience. A better user experience keeps visitors on your site and is a factor to achieve higher rankings in search engine results, which can lead to more traffic being sent to your website by search engines.
This article is simply a starting point of information and was not written to give a comprehensive understanding of image use on websites. If you don't have time to delve further into the subjects, you may want so simply hire a professional to help with your technology needs.
Dedicated Managers, Inc. would be glad to help you with any and all of your internet presence needs.
 Is Facebook Using Your Website to Profit from Helping Your Competitors?!
 Volunteering Days
 Microsoft Office Deployment Tool "Couldn't Install" Error
 How to Download and Install Microsoft Office 2019 Products Requested from TechSoup
 Understanding OAuth 2.0 Directly from the IETF RFC 6749 Specification
 VueJS Authentication with Auth0 - Using Vuex & Vue Router
 Real Time Database with Vue.js + Vuex + Vuetify + Firebase (Authentication + Firestore)
 Advertising & Graphic Design: Helping a Local Non-Profit Get Focused
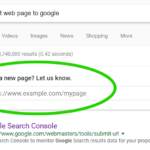 Submit Your New Website Page or Blog Post To Google for Instant Inclusion in Search Results
 Distributed Brute Force WordPress Login Attack Mitigated by WordFence Security